Google Tag Manager (GTM) Container Template: Tracking Made Easy
What is Google Tag Manager?
Google Tag Manager is a free tool from Google that allows you to manage various tracking codes (known as ‘tags’) on your website without having to directly modify your website's code. This makes it much easier to add, update and remove tracking elements.
BOTTIMMO GTM container template
Our template, developed specifically for BOTTIMMO customers, enables comprehensive event tracking for your widgets. It is perfectly tailored to your needs and easy to import.
👉🏽 Download GTM container template (JSON file)
What's included?
- Preconfigured events for clicks, form interactions, page views and more.
- Optimal settings designed specifically for marketing purposes.
- A flexible structure that can be easily adapted to your individual requirements.
💡 Need assistance?
If you require help with setup, our partner RealXLab will be happy to assist you.

RealXLab will help you set up tracking quickly and easily. Contact them here.
Already working with an advertising agency or website operator?
No problem! Simply forward these instructions to your agency or website operator so that the setup can be carried out smoothly.
Step-by-step instructions for importing the container
1. Log in to Google Tag Manager
- Visit https://tagmanager.google.com.
- Sign in with your Google account.
- Select the appropriate account and container to which you want to import the new container.
- If you do not yet have an account or container, create one first.
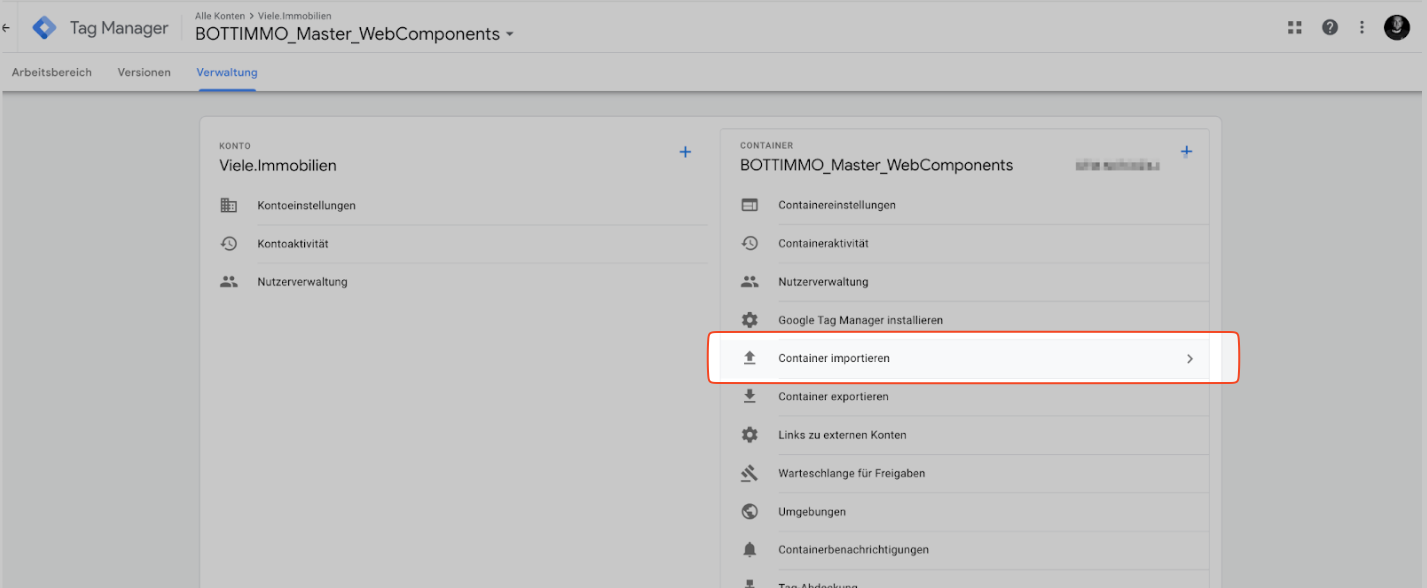
2. Navigate to Administration
- Click on Administration in the left-hand menu.

3. Import container
- Under the heading Container, you will find the option Import container. Click on it.
4. Select import file
- Click on Select file and select the downloaded JSON file from our sample container.
- Note: Download the JSON file here: BOTTIMMO GTM Container Template.
5. Select target workspace
- Select the workspace where you want to import the container.
- If you do not have a specific workspace, you can use the default workspace.
- Note: A workspace is a work area within your container where you can make changes.
6. Set import options
- Under Import option, select Merge.
- Under Conflicting tags, triggers and variables, select Rename conflicting tags, triggers and variables.
- Important: This ensures that your existing settings are not overwritten.
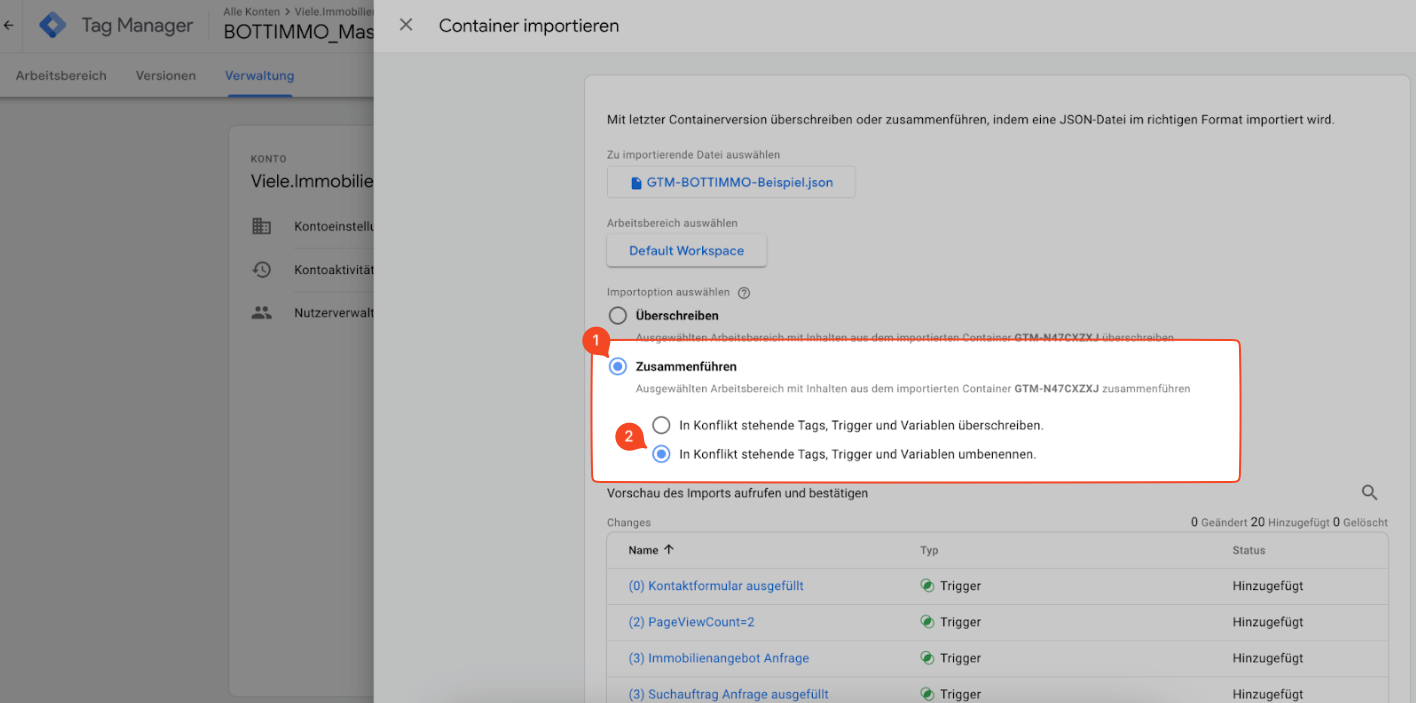
7. Confirm import
- Check the summary of the items to be imported.
- Click on Confirm to complete the import.
Adjusting the variables
After importing, some variables need to be updated with your own data so that tracking works correctly.
The variables can be found in the left-hand menu.
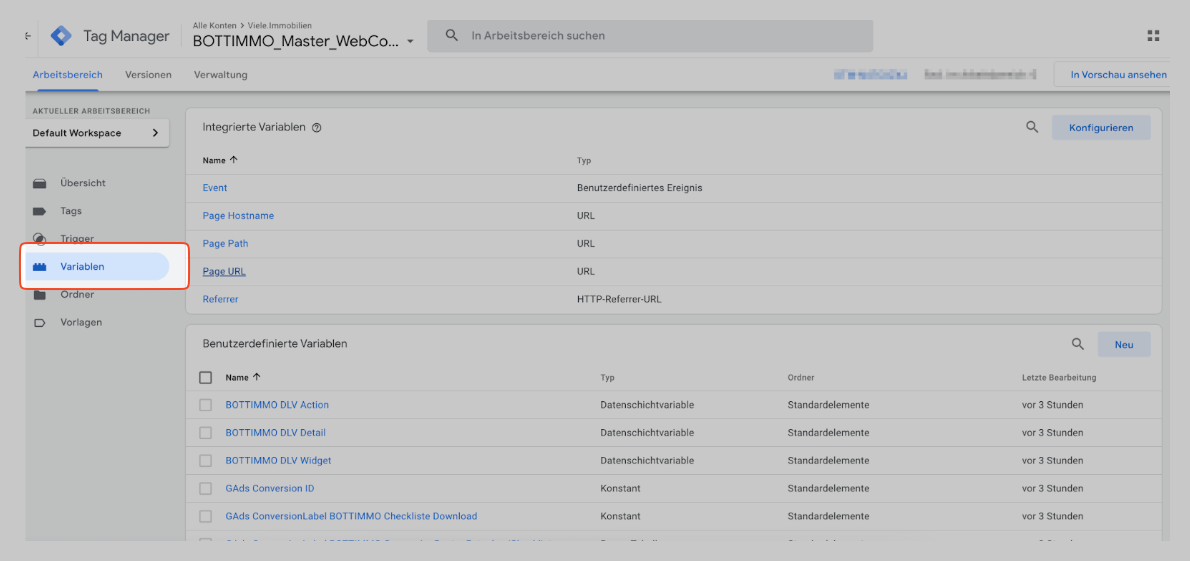
Update website domain
What is this? Your website domain (e.g. examplewebsite.com).
- Find the variable Website Domain.
- Replace domain.tld with your actual domain.
- Click Save.
Update Google Tag ID
What is this? Your individual Google Analytics 4 measurement ID (begins with ‘G-’). For more information, see Google Analytics Help.
- Find the variable Google Tag ID and click on it.
- Replace the placeholder G-xxx with your actual tracking ID (e.g. G-1234567890).
- Click Save.
Enter Google Ads Conversion ID
What is this? Your Google Ads Conversion ID is a unique number that identifies your Google Ads account.
- Find the variable GAds Conversion ID among the variables and click on it.
- Replace the placeholder XXX with your actual conversion ID (a number).
- Click on Save.
Update Google Ads conversion labels
What is this? A conversion label is a unique code that identifies a specific conversion action.
For different actions (e.g. form submissions, downloads), specific conversion labels from your Google Ads account must be inserted.
- Find the variables that start with GAds ConversionLabel BOTTIMMO.
- For each variable:
- Click on the variable to edit it.
- Replace XXX with the corresponding conversion label from your Google Ads account.
- Click on Save.
List of conversion labels to be updated:
- GAds ConversionLabel BOTTIMMO Checkliste Download
- GAds ConversionLabel BOTTIMMO Ratgeber Download
- GAds ConversionLabel BOTTIMMO Situationsanalyse ausgefüllt
- GAds ConversionLabel BOTTIMMO Immobilienbewertung ausgefüllt
- GAds ConversionLabel BOTTIMMO Immobilienbewertung (ReachLastStep)
- GAds ConversionLabel BOTTIMMO Grundstücksbewertung ausgefüllt
- GAds ConversionLabel BOTTIMMO Grundstücksbewertung (ReachLastStep)
- GAds ConversionLabel BOTTIMMO Leibrentenrechner ausgefüllt
- GAds ConversionLabel BOTTIMMO Tel. Beratung ausgefüllt
- GAds ConversionLabel BOTTIMMO Wohntraumfinder/Suchprofil ausgefüllt
- GAds ConversionLabel BOTTIMMO Teilverkauf ausgefüllt
Integration of tracking pixels (tags)
You must decide whether certain tracking pixels (e.g. Google Analytics, Meta Ads Pixel) should be loaded via Google Tag Manager or whether they are already integrated via another tool (such as a cookie consent manager).
Option 1: Integrate via the cookie consent manager
If you already use a cookie consent manager (such as Borlabs for WordPress), it often makes more sense to integrate the pixels there to ensure compliance with data protection regulations.
In this case, you do not need to configure anything else in Tag Manager. Optionally, you can also delete the 3 tags described in option 2.
Option 2: Load via Google Tag Manager
If you want to load the pixels via GTM, make sure that the corresponding tags are enabled. In our template, they are paused by default.
- Click on Tags in the left-hand menu.
- Search for the tags GTag Config, GAds Retargeting and MetaAds Pixel.
- Activate: If you want to load the tag via GTM, click on the tag and then on Unpause.
- Optional: You can also rename the tags (or remove the first part ‘AAA-only necessary if not stored in CookieConsent---’).


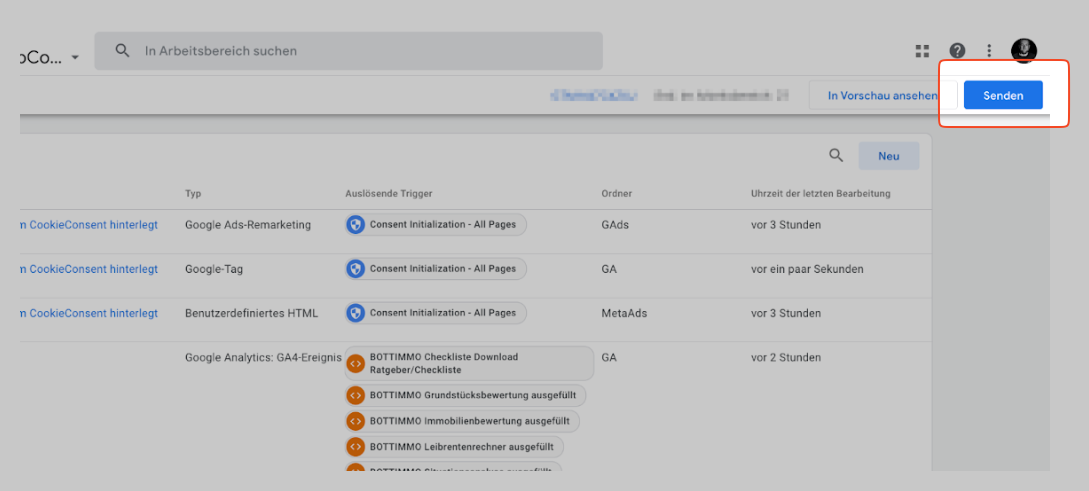
Publish changes
Once you have made all the adjustments, you must publish the changes so that they become active on your website.
- Click on Submit in the top right corner.
- Check the summary of the changes.
- Enter a version description, e.g. ‘Imported BOTTIMMO container and adjusted variables’.
- Click on Publish.